

Efficient data management is vital for all organizations, particularly as data continues to proliferate. Azure Storage Management Lifecycle from Microsoft Azure is a valuable tool for automating data management in Azure Blob Storage. Although it doesn’t work in V1 storage accounts, it works efficiently in V2 of Storage to ensure effective data management. In this blog, we'll discuss its benefits and provide a step-by-step guide to help you get started.
The Importance of Data Lifecycle Management
Data lifecycle management involves the process of managing data throughout its entire lifecycle, from creation and storage to retrieval and, ultimately, deletion. Effective data lifecycle management offers several benefits, including:
- Cost Reduction: Finding and removing unnecessary data saves money on storage.
- Compliance: Ensures that data is kept in line with laws and regulations, reducing risks.
- Performance Boost: Efficient data management speeds up access and system performance.
- Resource Allocation: Manages data to allocate resources effectively, while prioritizing critical data.
Azure Storage Management Lifecycle
Azure Storage Management Lifecycle is a feature that allows you to define policies to automatically manage the lifecycle of your data stored in Azure Blob Storage. It supports the following actions:
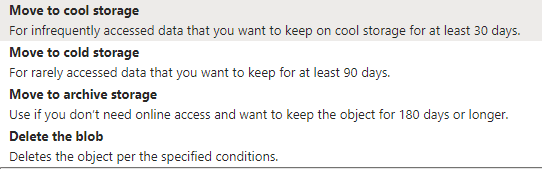
- Hot to Cool Tier: Automatically transition data from the more expensive Hot tier to the Cool tier when it becomes less frequently accessed. This can result in significant cost savings.
- Cool to Archive Tier: For even less frequently accessed data, you can set policies to transition it from the Cool tier to the Archive tier, which is the most cost-effective storage option.
- Delete: Define rules to delete data when it's no longer needed, helping you comply with data retention policies.
- Custom Actions: Besides the above, you can set up custom actions like copying data to another storage account or sending notifications when specific conditions are met.
Enabling Azure Storage Management Lifecycle
Step 1: Create a Storage Account
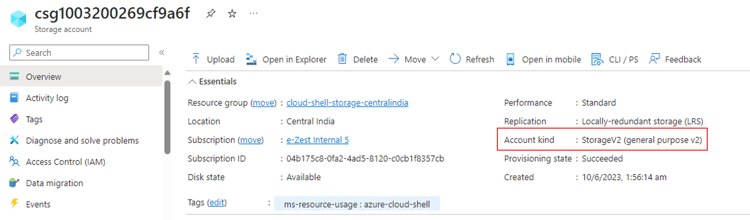
If you don't have a storage account, create one in the Azure portal. Choose the region and performance tier that best suits your needs but ensure that the account type is “StorageV2”.
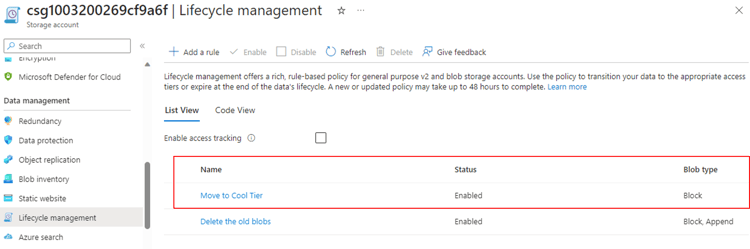
Step 2: Navigate to Lifecycle Management
- Go to your newly created storage account in the Azure portal.
- In the left-hand menu, under the "Settings" section, click on "Lifecycle management."
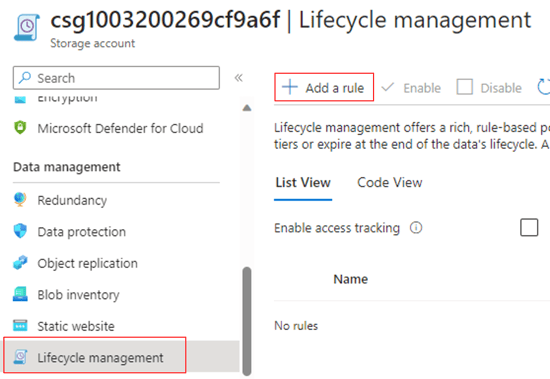
- Click on the "+ Add a rule" button to create a new management policy.
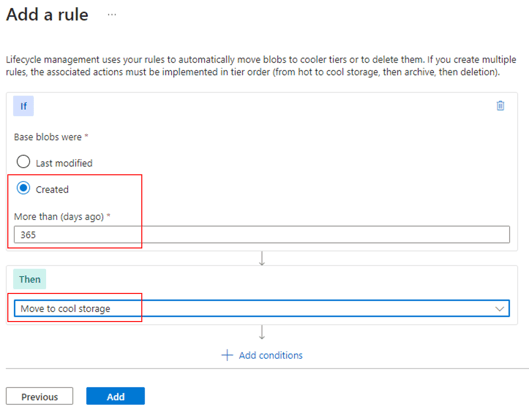
- Configure the policy according to your needs. For example, you can set rules for moving data to the Cool tier based on its created date. If the created date is older than 365 days, then move it to cool storage.
- Add & check.
In this way, you can add multiple conditions that are not only restricted to blobs but can also be applied to snapshots and other resources.
Step 3: Monitor and Adjust for future changes.
After applying the policy, monitor its performance regularly. You can review the policy's execution history and adjust it as needed to optimize your data management strategy further.
All the rules will show up under Lifecycle blade.
Enabling Azure Storage Management Lifecycle is a strategic move for organizations seeking to optimize data storage costs, enhance governance, and improve overall efficiency. Through automated data lifecycle management, you can efficiently place data in the right storage tier at the right time, reducing expenses while ensuring compliance with regulations. This empowerment in data management enables your organization to make informed, data-driven decisions, ultimately leading to increased efficiency and significant cost savings.
Read my recent blogs:


.png)