With Visual Studio a lot of things have changed especially after they have dropped the support for setup projects and instead promoting InstallShield for creating setup projects. One such scenario is passing command line arguments to custom actions.
This blog will help you understand ‘passing command line parameters to your Custom Actions written in setup projects’. It will enable creation of silent installs by taking the advantage of supplied command line parameters.
Custom actions are basically script or executable which is invoked before or after a specific event during installation. They can be used to copy files, modify settings, start/stop services or any other type of task that are not covered as a part of the installer. But often, these custom tasks may require some values for their operation to be supplied. Like name of a folder, service etc. This has to be passed to the custom action. But the user has no control over the custom action. So they have to be passed to the installer. And the installer has to pass them to the custom actions. One of the ways is to pass values as command line parameters while invoking the installer. It’s simpler when MSI installer is used. But when InstallShield is used, the command line parameters have to be passed to the InstallShield installer exe file. This in turn would pass the values to the MSI installer, which in turn would pass those to the custom action. The real problem is how to configure these 3 levels to pass and consume these parameters. Below is a step by step account of how to achieve this.
Invoke InstallShield setup.exe with command line arguments
You first need to pass the values to the InstallShield setup.exe from command line. The value can be passed as below:
setup.exe /v"PARAMETER1=Value PARAMETER1=Value"
The /v is a switch to specify that the following string has to be passed to MSI installer as it is without any changes or processing. So the entire literal value will be passed to the MSI installer as is. Special care should be taken while naming parameters. The names of parameters should be capitalized, so that they are considered as public properties. Otherwise they would be ignored if the user does not have sufficient permissions.
Invoke MSI package with command line arguments
Alternatively, if you are using MSI package for installation, passing values are simpler. Just pass the values as key/value pair at the end of the command.
msiexec /i setup.msi PARAMETER1=Value PARAMETER1=Value
Create a custom action
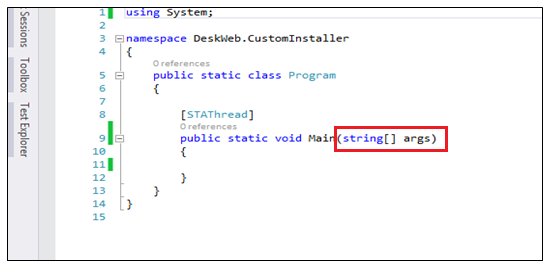
Now you need to create a custom action and set it up to receive the parameters you require. You can create a custom action using VBScript, Jscript or any EXE. You can even create a console/windows app and use the compiled exe as the custom action. This way it would be easier to retrieve the command line parameters as it would get passed directly to the Main() method as arguments.
To create a custom action:
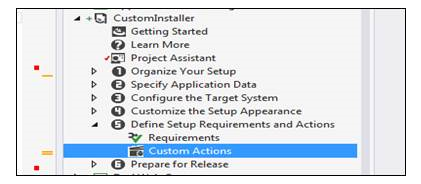
- Expand the installer project
- Expand “Define Setup Requirements and Actions”
- Navigate to Custom Actions

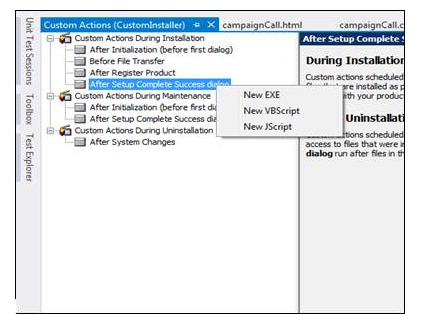
- There you should be able to see a list of steps/events during installation phase on which you can choose to execute your custom action. Right click on the step where you want your action to be executed and select “New EXE” to create a new exe file based custom action.

- Now select the newly created custom action. Give it a name, and you should be able to see the details on the right hand side. Fill out the appropriate details.
- In the Command Line field, enter what you want to be passed to the exe as a command line parameter. And whatever parameter you want to pass to the exe from the installer, you need to provide information about that too.
CustomParam1 “Custom Parameter 2" "[INSTALLDIR]" "[PARAMETER1]" "[PARAMETER2]"
Here, CustomParam1 is a custom parameter which will be passed as it is as the first command line argument to the exe. Custom Parameter 2 will also be passed as it is. It is enclosed in quotes as it has spaces in between. "[INSTALLDIR]" is a global property that is automatically passed to the installer and you can just use it. There are several others which can be directly used. Then you need to specify what parameters you are expecting to be passed to the exe from the installer. They need to be enclosed within “[]”. You can notice "[PARAMETER1]" "[PARAMETER2]” which will pass parameter1 and parameter2 from install.exe or setup.msi whatever you are using.
Receive the values in custom action
Now you need to retrieve the values in the exe you created. You can use a console or windows app that would generate an exe. And then the command line arguments would be passed as parameter to the Main() method. Just retrieve the values and you are good to go.

I hope this article made life easier for you while developing installer projects. Developing installers and custom actions with the new approach could be challenging, especially as the InstallShield is not free and the limited edition does not come with lot of features. So, I thought to share this solution for those, who are stuck in this type of issue.
If you think I've missed something, please let me know by adding it in the comments section.


