Public Cloud (e.g. AWS, Azure) <-> Private Cloud (e.g. Openstack) <->physical servers
If you wish to migrate your current environment from one platform to another (Physical Servers <-> Private Cloud <-> Public Cloud), take a look at Docker. Docker is an open source tool to build ship and run distributed applications on any platform. You also have the liberty to choose servers of your choice. For instance, you can choose base OS as windows server to host an application which was previously hosted on Linux server.

Why Docker?
Different platforms (where production servers are running) have different base hardware which makes it difficult to migrate to another platform. Docker makes this job easy as it is platform independent. This can be illustrated better with Docker’s architecture.
Docker Architecture:
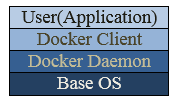
Fig.1. Docker Architecture Diagram.
Docker daemon is a continuously running service which is used as a communication medium between Docker client and base operating system. Users or applications can communicate with the base OS using Docker command line options provided by the Docker client.
The tool has two basic components - Docker image and Docker container. These are analogous with the terms ‘program’ and ‘process. If a running program is called as a process, then you can call a running image as a container.
IS Docker a Virtual Machine?
Docker containers are not Virtual Machines (VMs). They share resources of the base OS and don’t block the resources all the time like VMs. Hence if you run your application over Docker, your performance never gets hampered. Virtually, you can run as many containers as you wish on a single machine.
Migration Process:
Step 1: Install Docker on the server which you want to migrate from:
Linux machines:
- yum/apt-get/zyper install docker
- service docker start
(If you don’t find the Docker package, then add the repository accordingly).
Windows machine:
- Download the latest release from here and install it. (The above link may change according to the change in the version of Docker).
- Run the Boot2Docker Start (You will be prompt with a unix shell from where you can start working on Docker).
The following commands are used on both the machines. (Don’t use sudo before each command if you are not using a Linux server).
Step 2: Create Docker login, confirm and create a repository.
Create login:
- sudo docker login
It will ask for a username, password and email ID.
OR
You can create Docker login on the official website.
- You will receive an email. Click on the link and confirm your email ID.
- Create a repository on Docker web console. Make it public or private as per your choice.
Step 3: Pull image from Docker hub.
Docker hub is a registry where you can find pre-packed images available publically.
- sudo docker search search-query
Docker search utility is analogous with the yum search utility. It will list down all the images which are having ‘centos’ as a substring in their name. e.g. docker search centos
- sudo docker pull image-name
e.g. docker pull centos. This will pull image on the machine where Docker is running.
Step 4: Create container and exact environment as on base OS.
- sudo docker run –it image-name /bin/bash.
run: it will run an image.
i: run image into interactive mode.
t: provide pseudo terminal.
/bin/bash: This is the command which you wish to run on the newly created container. You can replace it with any other command.
Now you are prompt with the container’s terminal.
Create the exact environment on the container as it is on the base OS, i.e. install packages you need make changes in the configuration files, among other steps.
If you are unable to use internet on the container, then use the following command to run an image.
- sudo docker run –it –net=host image-name /bin/bash.
If you need to copy data from your base OS to the Docker container, use the following command:
- sudo docker run –it –v /Dir/on/BaseOS:/Dir/on/Container image-name /bin/bash.
The directory on the base OS will be mounted at the location provided in the container. Then copy your data on the desired location on the container.
Step 5: Commit container.
Caution: Don’t use “exit” command when you are logged in to the container as it will stop the container without committing the changes you made.
Use following sequence to come out of the container’s terminal without stopping it:
- Ctrl+p, then Ctrl+q
Run following command to see the list of running container:
- sudo docker ps
This command will output the list of running container.
To commit the container, use the following command:
- sudo docker commit container-id image-name
container-id: You can get this container id from the previous command.
image-name: The name of the image.
Step 6: Tag image and Push it over your repository:
To push an image over repository, the image_name must be in the following format: “User_name/Repo_name”
User_name: The user name set at the time of login.
Repo_name: The name of the repository on which you wish to upload your content.
If you wish to change the image_name then you can use following command:
- sudo docker image_name new_name:tag_name
tag_name: It is optional, used to describe the image.
To push image over repository:
- sudo docker push image_name
Step 7: Pull image over the newly created machine on new environment:
Before pulling image, you need to follow installation process again on the newly created server.
- sudo docker pull image_name
Step 8: Run container on the new machine using the pulled image.
- sudo docker run –it –p port_on_baseOS:port_on_container image_name /bin/bash
-p: This option is used to bind ports. The requests on the base OS port will be passed to the port on the container and the request will be served from container.
Now you can use the newly created machine as a production machine. That completes the migration of your server from one platform to the other.
Additional Info:
You always need the following command to attach or login into currently running container:
- sudo docker attach container-id
OR
- sudo docker exec –it container-id /bin/bash
Depending upon the version of the Docker, the above commands will work. Either both will run successfully or one of the commands will take you to the running container. If you cannot login with both the commands, then use the following link of the plugin called “nsenter”:
Finally, you can divide your application in to different modules and use different images to save it. You can link the containers using ‘docker link’ created from modular images. This methodology will be useful to troubleshoot the problems you usually face.