What is AWS Codecommit?
AWS CodeCommit is a version control service hosted by Amazon Web Services that you can use to privately store and manage assets in the cloud. It is secure, highly scalable, managed source control service that hosts private Git repositories. AWS CodeCommit eliminates the need for you to manage your own source control system or worry about scaling its infrastructure.
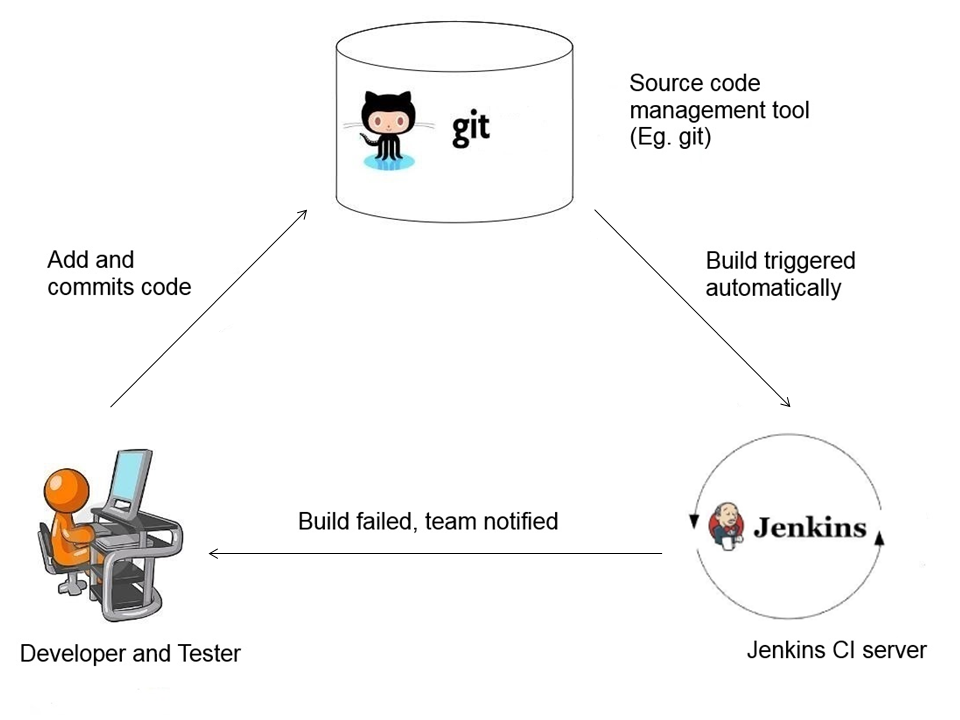
What is Jenkins?
Jenkins is an open source automation server written in Java. Jenkins helps automating the non-human part of the whole software development process, with now common things like Continuous Integration, but by further empowering teams to implement the technical part of a Continuous Delivery. It is a server-based system running in a servlet container such as Apache Tomcat.
What is SonarQube?
Sonar is an open source platform used by development teams to manage source code quality. Sonar has been developed with a main objective in mind: make code quality management accessible to everyone with minimal effort. It provides code analysers, reporting tools, defects hunting modules and TimeMachine as core functionality.
Pre-requisite:
- AWS CodeCommit Repository
Steps to install Jenkins:
Launch an instance with minimum configuration of t2.medium if SonarQube and Jenkins are on same instance
- Login to an instance (Root user is preferred).
- Check Java version. If Java is not present, install Java.
(Command:java -version)
- Install Jenkins. Hit the following commands:
- sudowget -O /etc/yum.repos.d/jenkins.repo http://pkg.jenkins-ci.org/redhat/jenkins.repo
- sudo rpm --import https://jenkins-ci.org/redhat/jenkins-ci.org.key
- sudo yum install Jenkins
- Start Jenkins.
Command: service jenkins start- In browser, open http://<PUBLIC DNS/IP>:8080
- On instance, enter the command
cat /var/lib/jenkins/secrets/initialAdminPassword - Install suggested plugins
- Create admin user, save and finish
- Start using Jenkins
- Select Manage Jenkins and Configure Global Security
- Select the Enable Security check box.
- Under Security Realm, select the Jenkins’ own user database radio button.
- Clear the Allow users to sign up check box.
- Under Authorization, select the Logged-in users can do anything radio button
- Manage Jenkins -> Manage Plugins. Check following plugins. If not available, install it
- Git plugin
- Git Client plugin
- SonarQube plugin
Steps to install SonarQube:
- Commands to install SonarQube are as follow:
- cd /opt/
- wget https://sonarsource.bintray.com/Distribution/SonarQube/SonarQube-5.4.zip
- unzip SonarQube-5.4.zip
- yum install mysql-server
- /etc/init.d/mysqld start
- vi SonarQube-5.4/conf/sonar.properties and uncomment following lines :
- sonar.jdbc.username=sonar
- sonar.jdbc.password=sonar
- sonar.jdbc.url=jdbc:mysql://localhost:3306/sonar?useUnicode=true&characterEncoding=utf8&rewriteBatchedStatements=true&useConfigs=maxPerformance
- sonar.web.port=9000
g. mysql
- create database sonar;
- CREATE USER 'sonar'@'localhost' IDENTIFIED BY 'sonar';
- GRANT ALL PRIVILEGES ON sonar.* TO 'sonar'@'localhost';
- FLUSH PRIVILEGES;
- exit
h. cd SonarQube-5.4
i. bin/linux-x86-64/sonar.sh start
- Go to link : http://<PUBLIC-DNS/IP>:9000
- Login (Username & Password = admin)
- Go to Administration -> System -> update centre
- Check for the required plugins and install them
- Restart SonarQube after installation of plugin
Configuration of Jenkins and AWS Codecommit:
- Enter following commands :
- yum install git
- yum install aws-cli
- cd ~jenkins
- sudo -u jenkinsaws configure
- Enter Access key ID of the AWS account user and hit enter
- Enter Secret key ID of the AWS account user and hit enter
- Default region name (print the same value as shown)- us-east-1
- Default output format (print the same value as shown) –json
e. sudo -u jenkins git config --global credential.helper '!awscodecommit credential-helper $@'
f. sudo -u jenkins git config --global credential.useHttpPath true
g. sudo -u jenkins git config --global user.email "<EMAIL ID OF THE USER>"
h. sudo -u jenkins git config --global user.name "<USERNAME OF THE USER>"
- Go to admin panel of Jenkins
- Click on New Item -> Enter name of project -> select Freestyle Project -> Ok
- In Source management -> select Git -> Enter the https URL of aws codecommit -> Save
Configuration of Jenkins and SonarQube:
- On Instance, execute the following commands :
- cd /opt/
- vi sonar.properties and paste following lines :
|
sonar.projectKey=<PROJECT KEY> sonar.projectName=<PROJECT NAME> sonar.projectVersion=1.0 sonar.language=php sonar.sourceEncoding=UTF-8 sonar.sources=. |
c. chmod 660 sonar.properties
- Go to SonarQube Dashboard
- Administration -> In Security, select Users -> In Admin user, Click on Token
- Generate token
- Copy the token
- Go to Jenkins Dashboard
- Manage Jenkins -> Global Tool Configuration -> SonarQube Scanner -> Add SonarQube Scanner
- Name : SonarQube
- Version : SonarQube scanner 2.8
- Check install automatically checkbox
- Manage Jenkins ->configuration Systemà In SonarQube server, click add SonarQube and add parameters as :
- Name : SonarQube
- Server URL : http://<PUBLIC DNS/IP OF SONARQUBE>:9000
- Server version : 5.3 or higher
- Server authentication token : Paste the token generated from SonarQube
- Click on Advanced
- Database URL : jdbc:mysql://localhost:3306/sonar?useUnicode=true&characterEncoding=utf8&rewriteBatchedStatements=true&useConfigs=maxPerformance
- Database login : sonar
- Database password : sonar
- Apply and Save
- Select created project -> click on configure
- In Build section, click on Add build Step and select Execute SonarQube scanner
- Configure as follow :
- SonarQube Installation : SonarQube
- Path to project properties : /opt/sonar.properties
Note: To Avoid this following error follow the steps:
Error:The last packet sent successfully to the server was 0 milliseconds ago. The driver has not received any packets from the server.
Steps:
- vi /etc/my.cnf
- Under [mysqld], paste the following line:
max_allowed_packet=256M - service mysqld restart
- service jenkins restart
- /opt/SonarQube-5.4/bin/linux-x86-64/sonar.sh restart
Source:
https://en.wikipedia.org/wiki/Jenkins_(software)
http://www.methodsandtools.com/tools/tools.php?sonar
http://docs.aws.amazon.com/codecommit/latest/userguide/welcome.html