We have often heard people talking about Apache Virtual Host
- What is it?
- Why do we need it?
Let’s take a ride to virtual host to know it better purpose:
- When we want to run multiple websites on a single server then we need virtual host.
- Most of our web root have
/www, so it has high chances of being hacked. Hence Virtual Host is used as it provides security.
By using virtual host we can set the document root the way we want.
e.g.

In the above example, we can see multiple websites on a single server.
We can configure Apache Virtual Host in 2 ways:
- IP-Based Virtual Host and
- Name-Based Virtual Host, mostly Name-Based Virtual Host is recommended.
IP-Based Virtual Host:
In this method, the two different web sites having different IP addresses point to the same server which is run by Apache.
e.g.
In the below example we can see there are 2 different sites, test1.com and test2.com having IP addresses 192.168.1.21 and 192.168.1.22 respectively.
Although they are 2 different IPs, their request is served by the same Apache running on that server using IP based virtual host.

Name-Based Virtual Host:
In this method, when we make a request Apache looks at the host name in the header and points the website as per the request.
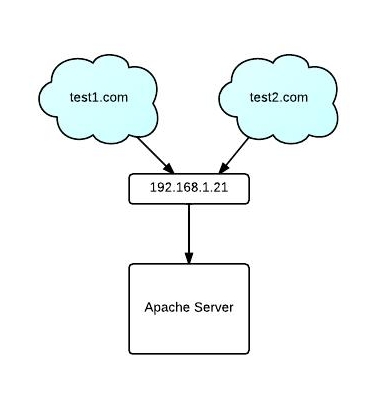
Name based virtual host having same IP address but different host names.
It’s like shared hosting where each user has a different website but still they are pointing to the same IP address.

In the above example we can see the two different hosts, test1.com and test2.com having the same IP address but the request is served by one Apache running on that server through Name based virtual host configuration.
Steps to make Name-Based Virtual Host:
- Start command line prompt
- Open file
httpd.confby following the below command
#vi /etc/httpd/conf/htttpd.conf - Uncomment the below line
Include conf/extra/httpd-vhosts.conf
This is the dedicated file to put all the virtual host configurations - Setup virtual hosts
Modify the
httpd-vhosts.confas shown below to setup name-based virtual host setting for two hosts.Uncomment below line
NameVirtualHost *:80– Indicates that all the name-based virtual hosts will be listening on the default port 80<VirtualHost *:80></VirtualHost>– Enclose all the Apache configuration parameters for each and every virtual host between these VirtualHost tags. Any Apache directives can be used within the virtualhost container.- In the following example, we are setting up virtual host for test1.com and test2.com listening on the same port 80. So, there will be two
<VirtualHost *:80></VirtualHost>, one for each website. - When you go to test1.com, the files under
/var/www/html/test1will be served by Apache.
#vi /etc/httpd/conf/extra/httpd-vhosts.confNameVirtualHost *:80<VirtualHost *:80> ServerAdmin kailash@test.com DocumentRoot /var/www/html/test1 ServerName test1.com ServerAlias www.test1.com ErrorLog /var/log/httpd/test1_a-error_log common CustomLog /var/log/httpd/test1_a-access_log common </VirtualHost> <VirtualHost *:80> ServerAdmin kailash@test2.com DocumentRoot /var/www/html/test2" ServerName test2.com ServerAlias www.test2.com ErrorLog /var/log/httpd/test2_a-error_log common CustomLog /var/log/httpd/test2_a-access_log common </VirtualHost>
- Check VirtualHost Configuration Syntax
- Restart the Apache and test
# service httpd restartNow, when you go to test1.com (or www.test1.com), the Apache will serve the files from
/var/www/html/test1directory.When you go to test2.com (or www.test2.com), the same Apache running on the same server will serve the files from
/var/www/html/test2directory.
Verify virtual configuration syntax using “httpd -S” as shown below. When everything is setup properly, it just displays “Syntax OK”.
# /usr/local/apache2/bin/httpd -S

VirtualHost configuration:

Syntax OK
References:


