Pre Requisite: Knowledge of AngularJS is needed.
Pentaho Community Dashboard Editor (CDE), which is a part of the Pentaho User Console (PUC), is a graphical tool for creating Interactive Dashboards.
Being open source, Pentaho CDE allows complete customization and freedom to use external components within its editor.
While working on a recent dashboard requirement, I wanted to use AngularJS in my dashboard.
AngularJS is a very powerful JavaScript Framework. It extends HTML DOM with additional attributes and makes it more responsive to user actions. AngularJS is open source, completely free, and most widely used by thousands of developers around the world. It aims to simplify both the development and testing efforts.
Below are the steps I followed to use AngularJS with Pentaho CDE:
1. Create New Pentaho CDE Dashboard in Pentaho User Console
2. Download and include Angular Min JS in Layout Tab in editor

You can also include additional JS, for example I have included “angular-ui.min.js” for UI components as shown above.
3. Add a row and include HTML in it as shown in the screenshot above. You can include html code here as below.
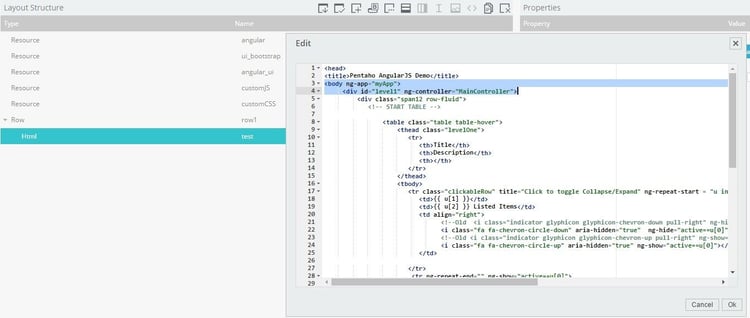
Include ng-app and controller in above HTML as highlighted above
<body ng-app="myApp">
<div id="level1" ng-controller="MainController">
4. Include external JS “customJS” file in layout and define angular app and controller as shown below:


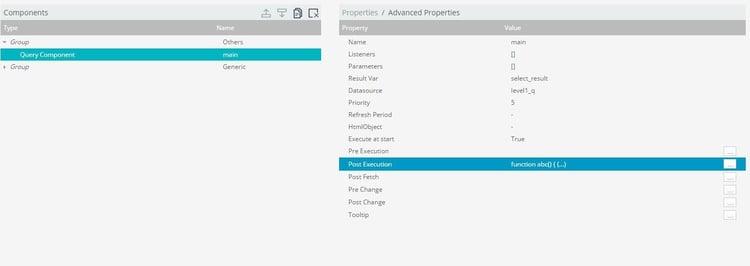
5. Now go to Components Tab in CDE editor and Add query component and call function defined in external JS that is included in CDE.
In following screenshot, I have defined a Query Component and within its Post Execution function, I am calling “create_custom_table()” function defined in customJS Java Script file.
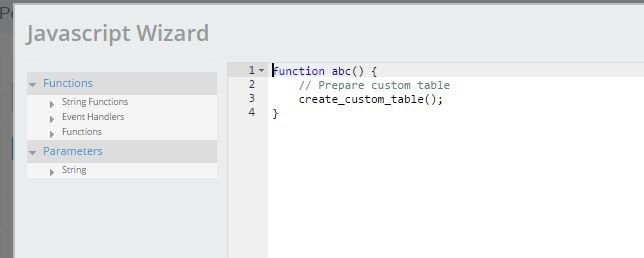
6. In the customJS included in Layout tab of CDE editor, define a function that we have called within Query Component above.
/*Call AngularJS Controller Function from outside */
function create_custom_table(){
}
7. Within this function, access Angular scope and call Angular function
/*Call AngularJS Controller Function from outside */
function create_custom_table(){
console.log(this.select_result);
var scope = angular.element(document.getElementById("level1")).scope();
scope.$apply(function () {
scope.getList(this.select_result);
});
}
8. Once we can access Angular scope, Angular directives can be used in html as needed. For example, I have defined a table that uses ng-repeat directive for loop within loop in code below.
<table class="table table-hover">
<tbody>
<tr ng-repeat = "t in level2Details">
<td></td>
<td>
<label id="" ng-repeat="r in level2Gates | filter:t[1]"></label>
</td>
</tr>
</tbody>
</table>
9. AJAX Call to fetch CDA Query output
For adding interactivity in dashboard, we often need to pass parameters to the SQL query during runtime.
CDA is a Pentaho plugin designed for accessing data with great flexibility. CDA can be used as a standalone plugin on the Pentaho BI server or in combination with CDE.
Open CDA file associated with the dashboard and select the data source as below:

Click on Query URL and get the HTTP URL as below:
http://<ip>:8080/pentaho/plugin/cda/api/doQuery?path=/public/Test/pentaho_angular.cda&dataAccessId=query1¶mlevel1=1
You can make AJAX Call by calling CDA HTTP URL to get query output as a JSON output as shown below:
var url = $scope.base_url + '/pentaho/plugin/cda/api/doQuery?path=/public/Test/ Pentaho_AngularJS_Dashboard.cda&dataAccessId=query1¶m1=';
$http.get(url+id).success(function(data) {
console.log(data.resultset);
$scope.level2Details = data.resultset;
}).error(function(data, status) {
alert('get data error!');
});
Once Pentaho is integrated with AngularJS, you can add advanced visualization and interactivity and not restricted to only the components provided by Pentaho CDE.

