Introduction
You can easily develop an application with stand-alone ReactJS MVC application by simply using the template which is shipped by default with Visual Studio. There is also an alternate way to build a client-side application architecture by leveraging the command and npm command of create-react-app command.
If you don’t know how to use this, please read about how to use create-react-app command which creates the boilerplate for react application and on top of that you can start developing the ReactJS application based on the structure which suits your project requirement better. Such type of application can be easily used with MVC Web API where you have no MVC View but only APIs to deal with.
Have you ever thought of an application structure with a hybrid approach where you have to use both MVC and ReactJS together? Yes, this might be one of the challenges where you need to integrate ReactJS component within the MVC View. But the question is how are we going to inject component within the MVC View?
Prerequisite
Before you dive deep into this blog it is expected that the target audience are familiar with
- ReactJS
- NET Core
- Little knowledge of Webpack
- Babel configuration and how it works
Hybrid structure
In hybrid structure, you integrate both MVC and client-side framework i.e. ReactJS together. When I say together, it is expected that you leverage the flavor of ASP.NET (CORE) and ReactJS.
Well, there are few third party Nuget packages which you can make use of, but you wouldn’t be having much control over third party packages. Few reasons are – your current version of Asp.net Core is 2.1 and the 3rd party Nuget package version requires you to move to 2.2 or vice versa and may be the package only supports JSX extension but not TSX(TypeScript) and you have to wait until the support is being given for TSX files.
These challenges are very obvious and relying on the 3rd party is quite highly dependent, and which may delay your project delivery by going through the POCs doing R&D on the 3rd party packages on which we don’t have any control.
So, what are we supposed to do now? Shall we continue exploring the 3rd party packages and keep googling until the new version is released for the package which fulfils the requirement.
Jokes apart, but instead of spending too much time on the one which we are not sure about, we could find the alternate way or better way where you have full control on what you do, how you do and most important that fulfils the requirement of your project requirement.
Yes, you got me right, writing your own configuration for the hybrid approach. In the next few sections, we will be understanding how we can write hybrid application which includes ASP.NET Core and ReactJS.
Let’s dive into the fun part of the discussion
Software requirements
In order to go ahead, I would like you to make sure that you follow the steps and create a simple sample application that uses hybrid approach.
Software requirements:
- Visual Studio/ Visual Code - Installed
- NodeJS - Installed
- Webpack
- net Core SDK
Getting started
Why we need hybrid applications if many things can be done by using the stand-alone applications or even using ReactJS build-in template provided by Visual Studio?
Think about the large enterprise application, which uses SPA and keep the flavor of MVC applications too where you have numerous views. And how difficult is it to manage such applications simply in react. Another example could be your application uses such as 3rd party complex tools which are not available in ReactJS. So, keeping the Hybrid approach can save you from all these complex problems where you have all the control of choosing which view would suit your requirement i.e. MVC View or React Component.
In this section, we will try to understand how to build and use such complex application which handles such complex business scenarios.
MVC Project set up
Open the visual studio and create an MVC Core project name it as ‘HYBRID.WEB’.
When a project is created go to Views/Home and open the Index.cshtml
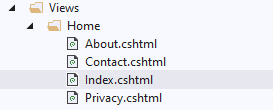
Remove all the content from Index.cshtml and keep it clean. We are done with this page for now and we will re-visit this page when our client-side application is set up and ready to be injected within the CSTML view.
Client side set up
Now, we are going to set up the client-side project under the MVC project. So that it can be injected within the MVC view i.e. <view name>.chtml.
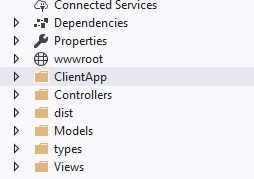
Create a directory let’s say ‘ClientApp’ on the root level of ‘HYBRID.WEB’
NPM Packages
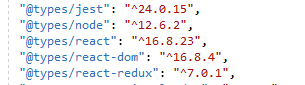
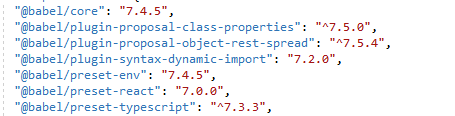
Open the command prompt on the root level of the ‘HYBRID.WEB’ project and install the libraries required for react typescript, see the package.json snippet.
Installing React
You can install the package by using the command
npm install --save react react-dom
npm install --save-dev @types/react @types/react-dom
If you have any prior knowledge to Typescript, you might know that in order to understand your client-side application and to be rendered on the web browser, it needs to be compiled and transformed to javascript files which the browser understands.
Installing Babel
Babel is a toolchain that is mainly used to convert ECMAScript 2015+ code into a backwards-compatible version of JavaScript in current and older browsers or environments.
npm install --save-dev @babel/preset-react
Create a file on the root directory of ‘HYBRID.WEB’ name it as ‘.babelrc’ and then configure the file and babel as mentioned below

Installing Webpack
At its core, webpack is a static module bundler for modern JavaScript applications. When webpack processes your application, it internally builds a dependency graph which maps every module your project needs and generates one or more bundles.
npm install --save-dev webpack
npm install --save-dev webpack-cli
Now we are all set to start the coding. The only one thing remaining now is setting up the webpack. Let’s do it now.
Webpack configuration
Webpack configuration is the key to this hybrid application and it plays the most important role in converting the react components to javascript, which later can be used in or injected inside MVC View.
Create a file ‘webpack.config.js’ under the root directory of project ‘HYBRID.WEB’ and configure the file as below.

Note: you need to install ts-loader, inline-source-map and other dependent packages by running npm install –save <<package name>
Script configuration
We are now all set to write our client-side react application and use it in MVC View. But before that, we need to configure our package.json scripts section which will help running the webpack.config.js setting which we have done in the previous section.
Let’s see how to configure the scripts in package.json.

Before writing the code, let’s open the command prompt under project root directory i.e. ‘HYBRID.WEB’
Now, we are all set to start writing our code and use it in MVC view by injecting the javascript file which is generated by Webpack.
Everything is in place now.
Create react component
This is the moment we were waiting for – writing the first react component and using it in MVC by injecting the javascript file generated by webpack under public directory of ‘wwwroot’ directory.
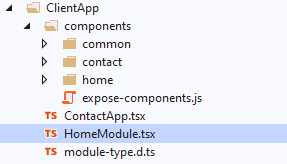
Create a directory say ‘components’ under ‘ClientApp’ which we had created previously.
Home Component
Under ‘components’ directory, create one more directory ‘home’ and under that create one typescript file say ‘HomeComponent.tsx’
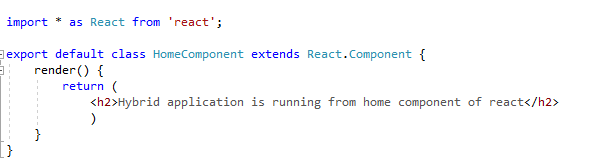
If you are familiar with the ReactJS you can simply write a component that shows a message.
The above code will parse the React component in browser as HTML <h2> tag. What is React and JSX syntax and how babel plays a role is altogether is a different topic and you can go through any blogs and websites for more information on this topic.
Module creation
So far, we have one react component i.e. ‘HomeComponent.tsx’ ready but how is it going to be used inside MVC View.
Well, here we will be setting up the module. A module is not any naming convention but something i use to refer.
Group of functionalities performed under one react component or say Container. Let’s create ‘HomeModule.tsx’ as we have created ‘HomeComponent.tsx’ which is very specific to perform a task related to home page activity.
You can decide the directory structure. I am creating a typescript file at a location ‘ClientApp/components’. Let’s name it as ‘HomeModule.tsx’.
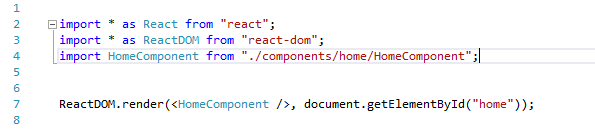
Now write few codes inside this file like below-
What are we doing in this file?
Well if you notice from lines 2 and 3, we are importing ‘react’ and ‘react-dom’ in order to use render method of ‘react-dom’.
Note: Please read more about this on your own if you are not familiar with these.
In line no.7, we are rendering the component which we have created i.e. ‘HomeComponent’ in previous section.
Render method takes two parameters:
- Which component needs to be rendered
- Where do you want to render the element
Now go to the ‘Views/Home’ and there we have Index.cshtml which we will be modifying now and after the modification, the Index.cshtml will look something like below-
Note:
- Element id is the same as the render method’s second parameter where you want to render this component. Ids must be same in order to render the HomeComponent to cshtml
Run npm
Here comes the part where all your efforts so far are going to be seen on the screen. But before that, you need to run a command-
npm run build or npm run watch
build one-time activity - running in this mode any changes wouldn’t be reflected until you re-run the same command.
watch and keep checking the file if something is modified then it will invoke webpack to build and compile the changes.
When you run either of the commands a file under ‘wwwroot’ will be created by the name ‘publish’. under this directory, you will have all the compiled javascript from your Typescript.
If you notice in the below image there are home.bundle.js file is created. You must be wondering how this file got created. Remember we had configured the webpack in ‘Webpack Configuration’ section – there we had mentioned entry object and had given a name.

But how come in home.bundle.js you have the answer in the configuration section only i.e. output object, see the below image

Here, we are telling webpack that creates a file with the [name].bundle.js which is home.bundle.js and we are also specifically telling webpack that copy these generated files under wwwroot/publish directory.
The location looks like this-
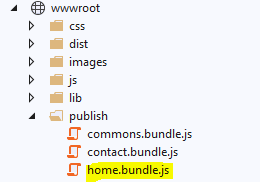
Injecting react component to View
Here comes the final step. In the above section, we see the commons.bundle.js and home.bundle.js files are created. commons.bundle.js files hold the references of multiple entries such as files like home.bundle.js, contact.bundle.js.
So, if you see the commons.bundle.js file then you can add this script file it _Layout.cshtml as this is going to be common to all the pages.
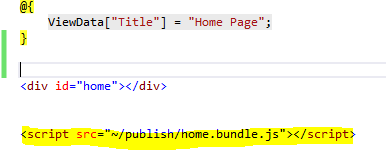
We have Index.cshtml page where we will be injecting our react component like below

These bootstraps the home component in Index.cshtml and you will see the <h2> tag with the message.