

OSSEC Agent/Server installation & configuration:
1. Configure OSSEC Server
- To get OSSEC email alerts first install and configure any mail service like Postfix, Sendmail etc
- Install required dependencies also (Only for Debian systems).
Update the list of available packages and their versions.
apt-get update
Install newer versions of the packages.
apt-get upgrade
Install required packages.
OSSEC requires gcc & make to compile & install.
apt-get install build-essential
To install make & gcc on Debian based systems.
yum install make gcc
To install make & gcc on RHEL based systems. - Download the latest version of the OSSEC (Choose version as per your requirement).
wget https://github.com/ossec/ossec-hids/archive/2.9.3.tar.gz
You can find more OSSEC packages on below URL.
https://github.com/ossec/ossec-hids/releases
- Extract the downloaded file.
tar -xvzf 2.9.3.tar.gz - Change the directory to the extracted directory.
cd ossec-hids-2.9.3 - Run install.sh to install OSSEC.
sh install.sh
You will get prompt to answer some questions.
(en/br/cn/de/el/es/fr/hu/it/jp/nl/pl/ru/sr/tr) [en]:enSelect your language.
What kind of installation do you want? (server, agent, local, hybrid or help)
Server
server: To install only OSSEC server.
agent: To install only OSSEC agent.
local: To monitor the server it has been installed on.
hybrid: To install OSSEC server & agent on same system.
help: To get help related to installation.
Setting up the installation environment
Choose where to install the OSSEC HIDS [/var/ossec]:
Location to install OSSEC.
Configuring the OSSEC HIDS
(1) Do you want e-mail notification? (y/n) [y]: y
What's your e-mail address? <Alert_Recipient_Mail_ID>
(2) What's your SMTP server ip/host? <SMTP_Server_IP>
(3) Do you want to run the integrity check daemon? (y/n) [y]: y
(4) Do you want to run the rootkit detection engine? (y/n) [y]: y
(5) Do you want to enable active response? (y/n) [y]: y
(6) Do you want to enable the firewall-drop response? (y/n) [y]: y
(7) Default white list for the active response:
(8) Do you want to add more IPs to the white list? (y/n)? [n]: n
(9) Do you want to enable remote syslog (port 514 udp)? (y/n) [y]: y
Installing the system
- To manage OSSEC service.
/var/ossec/bin/ossec-control stop
/var/ossec/bin/ossec-control restart
/var/ossec/bin/ossec-control status
- Add OSSEC agent on OSSEC server.
Perform following steps on OSSEC server:
Execute below command to manage OSSEC agent
/var/ossec/bin/manage_agents
(A)dd an agent (A).
* A name for the new agent: OSSEC_Agent_1
* The IP Address of the new agent: <OSSEC_Agent_1_IP>
* An ID for the new agent [001]:
* Agent information:
ID: 001
Name: OSSEC_Agent_1
IP Address: <OSSEC_Agent_1_IP>
Confirm adding it?(y/n):y
(E)xtract key for an agent (E).
* Provide the ID of the agent to extract the key (or '\q' to quit): 001
* Copy extracted key then quit.
(L)ist already added agents (L).
* To list out added agents.
(R)emove an agent (R).
* Provide the ID of the agent to be removed (or '\q' to quit): 001
* Confirm deleting it?(y/n):y
(Q)uit.
Restart OSSEC service after you add agent.
2. Configure OSSEC Agent
a) Perform Step a to Step e from OSSEC Server configuration to install OSSEC agent.
b) Run install.sh to install OSSEC.
sh install.sh
You will get prompt to answer some questions.
(en/br/cn/de/el/es/fr/hu/it/jp/nl/pl/ru/sr/tr) [en]:en
Select your language.
What kind of installation do you want? (server, agent, local, hybrid or help)
agent
Setting up the installation environment.
Choose where to install the OSSEC HIDS [/var/ossec]:
Location to install OSSEC.
Configuring the OSSEC HIDS.
(1) What's the IP Address or hostname of the OSSEC HIDS server?: <OSSEC_Server_IP>
(2) Do you want to run the integrity check daemon? (y/n) [y]: y
(3) Do you want to run the rootkit detection engine? (y/n) [y]: y
(4) Do you want to enable active response? (y/n) [y]: y
(5) Setting the configuration to analyze the following logs: Press Enter
Installing the system
c) Add OSSEC agent to OSSEC server.
Perform following steps on OSSEC agent.
i) /var/ossec/bin/manage_agents
(I)mport key from the server (I).
* Paste it here (or '\q' to quit): Paste extracted OSSEC agent key
* Agent information:
ID: 001
Name: OSSEC_Agent_1
IP Address: <OSSEC_Agent_1_IP>
Confirm adding it?(y/n):y
(Q)uit.
d) To start OSSEC service.
/var/ossec/bin/ossec-control start
3. Centralized Agent Configuration
Sometimes you will get below error while starting OSSEC service on agent.
"ossec-syscheckd (1226): ERROR: Error reading XML file '/var/ossec/etc/shared/agent.conf': XMLERR: File '/var/ossec/etc/shared/agent.conf' not found."
“/var/ossec/etc/shared/agent.conf” file holds the configuration for agents. With this file configured you can manage all agents centrally i.e. from OSSEC server itself.
First, create “/var/ossec/etc/shared/agent.conf” file on OSSEC server with required configuration.
This file will get sync on agent at same location with same name when you restart the OSSEC service on agent.
The configuration in this file is same as “/var/ossec/etc/ossec.conf” but you can create more specific configuration as per agent name, OS etc as follows.
<agent_config name="OSSEC_Agent_1">
<localfile>
<location>/var/log/maillog</location>
<log_format>syslog</log_format>
</localfile>
</agent_config>
<agent_config os="Linux">
<localfile>
<location>/var/log/*</location>
<log_format>syslog</log_format>
</localfile>
</agent_config>
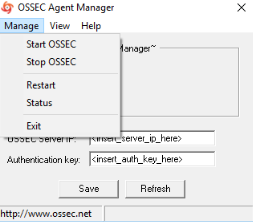
4. Configure OSSEC agent on Windows OS
a) Download Windows OSSEC agent setup from below URL & Install it.
http://www.ossec.net/downloads.html
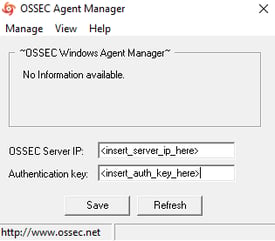
c) Restart OSSEC agent from OSSEC Agent Manager
5. Automatically add new OSSEC agents to OSSEC server
OSSEC agent and server authenticate & communicate using authentication keys in a secure manner. Each agent share a key-pair with the server. However, here is one problem, if you have a hundred agents you need a hundred keys.
To eliminate this time consuming process you can add new daemon on the server, called ossec-authd. With ossec-authd, you can create centralized key authentication. By default, ossec-authd listen on port 1515.
First, you need to create the certificate & private key for SSL.
- Perform below steps on OSSEC server
i. To install SSL development tool
apt-get install libssl-dev
To install SSL package on Debian based systems.
yum install openssl-devel
To install SSL package on RHEL based systems.
ii) To generate SSL key
openssl genrsa -out /var/ossec/etc/sslmanager.key 2048
SSL key will get stored in “/var/ossec/etc/sslmanager.key”
iii) To generate SSL certificate
openssl req -new -x509 -key /var/ossec/etc/sslmanager.key -out /var/ossec/etc/sslmanager.cert -days 365
Leave answer field blank it will take default value.
If you enter '.', the field will be left blank.
Country Name (2 letter code) [AU]:
State or Province Name (full name) [Some-State]:
Locality Name (eg, city) []:
Organization Name (eg, company) [Internet Widgits Pty Ltd]:
Organizational Unit Name (eg, section) []:
Common Name (e.g. server FQDN or YOUR name) []:
Email Address []:
SSL certificate will get stored in ‘’/var/ossec/etc/sslmanager.cert’’
iv) To start ossec-authd
/var/ossec/bin/ossec-authd -p 1515 >/dev/null 2>&1 &
v) To restart OSSEC service.
/var/ossec/bin/ossec-control restart
- Perform below steps on OSSEC agent
First, rename the file as "ossec-hids-2.9.3/etc/preloaded-vars.conf" and make required changes. Therefore, install script (install.sh) can collect the answers to its questions.
ii. To complete authentication process on agent.
/var/ossec/bin/agent-auth -m <OSSEC_Server_IP> -A <Agent_Name> -p 1515
INFO: Connected to <OSSEC_Server_IP>:1515
INFO: Using agent name as: <Agent_Name>
INFO: Send request to manager. Waiting for reply.
INFO: Received response with agent key
INFO: Valid key created. Finished.
INFO: Connection closed.
iii. To restart OSSEC service.
/var/ossec/bin/ossec-control restart
- Sometimes you will face below error while configuring authentication key. In this case, just try with different version of OSSEC.
- Do not use underscore (_) in Agent name parameter.
OSSEC agents communicate with OSSEC server on 1514/UDP in secure mode.
OSSEC agents are “passive” one; they do not run rules, they just send logs to the OSSEC server, and receives active-response instructions from the server. OSSEC server gathers everything and triggers rules, alerts and active-response.
7. Below are some important files of OSSEC
a) /var/ossec/etc
OSSEC configuration files. Mainly
i. ossec.conf - Main configuration file
The ossec.conf has 6 sections:
global (global);
You can manage SMTP server, email settings like alert recipient & sender here. In addition, you can white list some host/IP here. By default, OSSEC sends 12 emails alerts per hour. You can increase or decrease that no between 1 and 9999.
<global>
<email_notification>yes</email_notification>
<email_to>Alert_Recipient_Mail_ID</email_to>
<smtp_server>SMTP_Server_IP</smtp_server>
<email_from>Sender_Mail_ID</email_from>
<email_maxperhour>N</email_maxperhour>
<white_list>127.0.0.1</white_list>
</global>
rules (rules);
You can specify rule files to load. Therefore, OSSEC can perform as per those rules.
<rules>
<include>rules_config.xml</include>
<!-- <include>policy_rules.xml</include> -->
<Include>pam_rules.xml</include>
</rules>
When you need to write your own rules, then you need to modify the “/var/ossec/rules/local_rules.xml”.
syscheck (syscheck/rootcheck);
You can manage files, which should be check and ignore by OSSEC here. In addition, you can change system check frequency also. You can enable real time monitoring.
<syscheck>
<!-- Frequency that syscheck is executed - default to every 22 hours -->
<frequency>79200</frequency>
<!-- Directories to check (perform all possible verifications) -->
<directories check_all="yes">/etc,/usr/bin,/usr/sbin</directories>
<directories check_all="yes">/bin,/sbin</directories>
<!-- Real-Time Monitoring with require file check -->
<directories report_changes="yes" realtime="yes" check_all="yes">/etc,/usr/bin</directories>
<directories report_changes="yes" realtime="yes" check_all="yes">/root,/var/www</directories>
<!-- Real-Time Monitoring with specific file check -->
<directories report_changes="yes" realtime="yes" restrict=".php|.js|.py|.sh|.html" >
<!-- Files/directories to ignore -->
<ignore>/etc/mtab</ignore>
<ignore>/etc/mnttab</ignore>
<!-- Windows files to ignore -->
<ignore>C:\WINDOWS/System32/LogFiles</ignore>
<ignore>C:\WINDOWS/Debug</ignore>
</syscheck>
Also rootcheck files configured by default here.
<rootcheck>
<rootkit_files>/var/ossec/etc/shared/rootkit_files.txt</rootkit_files>
<rootkit_trojans>/var/ossec/etc/shared/rootkit_trojans.txt</rootkit_trojans>
<system_audit>/var/ossec/etc/shared/cis_rhel5_linux_rcl.txt</system_audit>
</rootcheck>
alerts (alert);
log_alert_level:
Level at which alert is stored (in log/alerts/alerts.log)
email_alert_level:
Level at which alert are sent by email
<alerts>
<log_alert_level>1</log_alert_level>
<email_alert_level>7</email_alert_level>
</alerts>
Even with a specific level set in email_alert_level, you will received some alerts that are below this threshold. Because some rules are configured to be sent, whatever the level is
active-response (command/active-response);
You can configure active-response here as per your need.
<!-- Active Response Config -->
<active-response>
<!-- This response is going to execute the host-deny
- command for every event that fires a rule with
- level (severity) >= 6.
- The IP is going to be blocked for 600 seconds.
-->
<command>host-deny</command>
<location>local</location>
<level>6</level>
<timeout>600</timeout>
</active-response>
collector (localfile)
You can manage all files monitored by OSSEC. You can add specific files you want monitor. You can add regular expression to monitor files as per your need.
<!-- Files to monitor (localfiles) -->
<localfile>
<log_format>syslog</log_format>
<location>/var/log/messages</location>
</localfile>
<localfile>
<log_format>syslog</log_format>
<location>/var/log/secure</location>
</localfile>
ii. decoder.xml & local_decoder.xml – Decoder log parsing regular expressions
iii. /var/ossec/logs
All OSSEC logs are available here
ossec.log – Output of OSSEC itself
/alerts/alerts.log – This file contains all alerts generated by OSSEC
iv. /var/ossec/rules
This directory contains all regular expressions used to generate alerts. You can change behaviour of OSSEC by modifying rules under this directory.
8. OSSEC Daemons:
a) Analysisd – Does all the analysis (main process)
b) Remoted – Receives logs from agents
c) Logcollector – Reads log files
d) Agentd – Sends logs to the server
e) Maild – Sends alerts through e-mails
f) Execd – Executes the active responses
g) Monitord – Monitors agent status, signs and compresses log files, etc
h) Syscheckd - Checks configured files for changes to the permissions, checksums and ownership
9. OSSEC alert levels:
OSSEC alerts are classified in multiple levels. From the lowest (00) to the maximum level 16. Levels 1 is not in use right now.
Each rule is configured with an alert level. In addition, when a rule is triggered, depending on its level, it is sent (or not) by email.
Below is the description of each level:
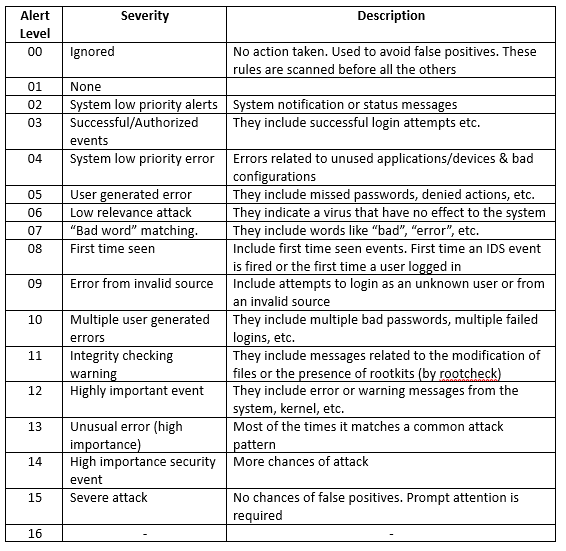 As per alert level, you get to know that alert is critical or not. However, alert message should be the deciding factor.
This is how you can install and configure OSSEC-HIDS on Amazon EC2 Instance.