Introduction:
We all know that the success of the project strictly depends on the quality of code. With the growth of the project and development qualification, every programmer comes to the necessity of finding a tool. A tool that helps to improve code quality and to make it stable.
There are many tools available in the market to check code quality and generate code quality reports. If you are planning to build a quality application then you must think about the code quality at the time of development.
I have tried my best to write some simple steps below for checking PHP code quality using SonarQube tool. Following steps are performed on Ubuntu 16.04 Server with root user permission:
Step 1: Create MySQL database user for SonarQube to store reports data into database
Login to MySQL root user:
mysql -u root -p
Execute following commands to create database, database user and grant permissions to database:
CREATE DATABASE <<dbname>> CHARACTER SET utf8 COLLATE utf8_general_ci;
CREATE USER '<<user>>' IDENTIFIED BY '<<pwd>>';
GRANT ALL ON <<dbname>>.* TO '<<user>>'@'%' IDENTIFIED BY '<<pwd>>';
FLUSH PRIVILEGES;
Step 2: Download & setup SonarQube
https://www.sonarqube.org/downloads/
unzip sonarqube-6.5.zip
mv sonarqube-6.5 /opt/sonar
Step 3: Configure SonarQube with MySQL
vi /opt/sonar/conf/sonar.properties
And update the following in the ‘properties’ file:
sonar.jdbc.username=<<username>>
sonar.jdbc.password=<<pwd>>
sonar.jdbc.url=jdbc:mysql://<<host>>:<<port>>/<<dbname>>?useUnicode= true&characterEncoding= utf8&rewriteBatchedStatements= true&useConfigs= maxPerformance
You will also need to update following to access SonarQube through web URL:
http://<<host>>:9000/sonar
sonar.web.host=127.0.0.1
sonar.web.context=/sonar
sonar.web.port=9000
Step 4: Run SonarQube as service
Create the file /etc/init.d/sonar with below content:
#!/bin/sh
#
# rc file for SonarQube
#
# chkconfig: 345 96 10
# description: SonarQube system (www.sonarsource.org)
#
### BEGIN INIT INFO
# Provides: sonar
# Required-Start: $network
# Required-Stop: $network
# Default-Start: 3 4 5
# Default-Stop: 0 1 2 6
# Short-Description: SonarQube system (www.sonarsource.org)
# Description: SonarQube system (www.sonarsource.org)
### END INIT INFO
/usr/bin/sonar $*
Register as a Linux service:
sudo ln -s /opt/sonarqube/bin/linux-x86-64/sonar.sh /usr/bin/sonar
sudo chmod 755 /etc/init.d/sonar
sudo update-rc.d sonar defaults
Start and Stop SonarQube service once to reflect all changes
service sonar start/stop/status
Step 5: Login to SonarQube and install required plugins
Login to SonarQube ( http://localhost:9000/sonar/) with default ‘admin’ user with password - admin, and make sure that following plugins are in place:
PHP
CSS
Web
JavaScript
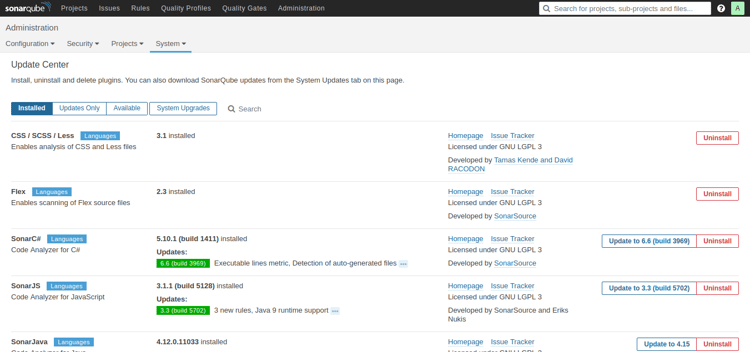
Go to Adminstration->Settings->Update Center (refer screenshot below):
Step 6: Setup Sonar scanner and configure PHP project
Download Sonar scanner (previously called as runner) and extract into /opt/sonar-scanner/
https://sonarsource.bintray.com/Distribution/sonar-scanner-cli/sonar-scanner-cli-3.0.3.778-linux.zip
cd /opt/sonar-scanner/
mkdir /opt/sonar-scanner/<<project name>>
cd <<project name>>
Now create sonar project property file and add following content:
vi sonar-project.properties
sonar.projectKey=<<project unique key>>
sonar.projectName=<<Project Name>>
sonar.projectVersion=1.0
sonar.modules=phpmodule, cssmodule, jsmodule
phpmodule.sonar.sources=<<path to your php project codebase folder>>
phpmodule.sonar.language=php
sonar.sourceEncoding=UTF-8
phpmodule.sonar.projectBaseDir=<<project base dir>>
Step 7: Execute Sonar running and generate code quality reports
cd /opt/sonar-scanner/
bin/sonar-scanner -Dproject.settings=mage2/sonar-project.properties
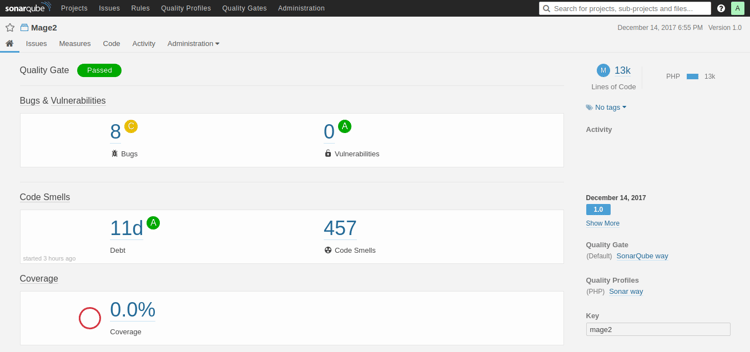
You can see generated report in SonarQube under Project->All Project:
For more reference please follow link below:
https://docs.sonarqube.org/display/SCAN/Analyzing+with+SonarQube+Scanner
In my next blog I will try to write how to automate this process using Jenkins.


.png)
.jpg)